Wednesday, July 6, 2011

Mini Cheesecakes with Endless Possibilities (and Blueberry Compote)

Okay, "endless possibilities" might be a bit of an overstatement, but these little cheesy gems really give you a lot of flavor options.  Just think, with normal 3x4 muffin tin, you could make 12 different cheesecakes!  This was my first solo attempt at making cheesecake, so this time around I just made 2 types:  twix and plain, both with Oreo crust.

I recently discovered Stumbleupon.com, which connected me with both Craftgawker.com and Foodgawker.com.  I have such a long list of crafts and recipes to try now, I should never be bored!  But anyway... One of these sites directed me to a recipe for mini Twix cheesecakes.  Everything about the recipe sounded delicious: Oreo cookie crust, pieces of twix, tiny individual portions. 

So, I wrote myself a list, got out of my computer chair, and walked to the grocery store.  On the way to the store, I stopped at my favorite coffee shop, Globehopper, to try their July signature beverage, something I had yet to try.  It was called a Tahitian Pop and it combined homemade cream soda with espresso, a dash of cream, and an orange slice.  Oh my amazing!  My friend Kimmy was working that day and we chatted about the cheesecake I was about to make and our love for Craft/Foodgawker.  I mentioned that I was going to buy a disposable muffin tin and she lent me one of the shop's tins!  I love my neighborhood.  Kimmy also got the idea of blueberries in my head, so I decided to make half of my cheesecakes with Twix and half of them plain.  This way I could top them with blueberry compote.


Here's what you need:

1/2 pack of oreos
6 Tbsp melted butter
1 packed of cream cheese, softened
1/2 c sugar
1/2 tsp vanilla
2 eggs
1/2 c sour cream
1 pack mini twix bars


Crush the oreo cookies into a fine crumb.  You can do this with a food processor if you have one, or you can do what I did:

Put all of your cookies into a large ziptop bag.  Use a rolling pin (or a wine bottle, like I did, if you don't have one) and crush the cookies.  To avoid puncturing the bag, sandwich it in a kitchen towel while rolling.
Add the crushed cookies to a bowl and mix in the melted butter.  Spray your muffin tin with non stick spray and evenly distribute the buttery crumbs into each cup.  Press into the cups with your fingers or with the bottom of a glass.

Next, take the softened cream cheese and beat in a bowl for 2-3 minutes. 
Add the sugar and beat for 1 minute.
Add eggs and beat until smooth.
Add sour cream and beat until smooth.

Chop up the twix bars into small pieces and gently fold them into the batter.  I separated out half of my cheese batter before mixing in the twix, so that I could have some plain cakes.  If you wanted to have a different cake in each cup, I would recommend pouring plain batter into the cups and adding the extra flavorings/ingredients to each cup, afterward.

Pour the batter into the cups, being careful not to overflow.

Bake at 300 degrees for 30 minutes.

When they come out of the oven, they might still be a little jiggly, but that's okay, they will firm up.

Once the cakes have cooled a bit, run a knife around the edges to loosen them from the pan.
I was super excited about these, so I popped them in the freezer for a quicker cool down.  That way, I could eat them sooner.  If you're not in as much of a rush to try one, you can let them cool in the fridge for a few hours.  Once cooled, I carefully eased them out of the tin.  I dressed the plain ones with blueberry compote and whipped cream and the Twix ones I left as they were.

Here's a quick recipe for blueberry compote (sauce):
1 pint blueberries
3/4 c sugar
1/2 c water
1 squirt of honey
juice of half a lime and the zest from that half
1 tsp cornstarch

Combine all the ingredients in a sauce pan and simmer over medium heat for 10 minutes.  Cool and use for anything!  It's obviously a perfect mate for cheesecake, but I love this blueberry sauce with greek yogurt and granola or grapenuts.  I happened to have a lime in my fridge when I made this particular batch.  I think it just works nicely with a little citrus addition.  I have used lemon, of course, but I bet OJ and orange zest would also be tasty.

If you make these, get creative!  Use you favorite type of cookie for the crust instead of oreos (pb , lemon, vanilla wafers, cinnamon graham crackers...).   You could really add anything to the cheesecake batter or on top of the little cakes (m&ms, pb cups, dulce de leche, nutmeg, chocolate ganache...).  I'm getting excited just thinking of the tasty combos. 

Sunday, April 24, 2011

I eat fish a lot...

As a waitress, my "weekends" tend to be on random weekdays.  So, this happened to be my Tuesday night off dinner celebration.  I often buy tilapia as my star protein for meals and vary between more and less creative ways to prepare it.  I walked through the produce section of Kroger that afternoon looking for the best-looking veggies.  I initially picked up some pretty lame-looking asparagus, but, since it's in season, I figured it would taste the best.  After a little more wandering I discovered bundles of broccolini and bulk carrots on sale!  So, I ditched the asparagus and decided on a side dish of garlic carrots and broccolini.   I love cooking fresh veggies, but I like to be cost-conscious about it, otherwise I buy frozen.


 2 Tilapia fillets (I cut the thinner sides of two fillets off and froze them, leaving the two thicker pieces above)
1/4 cup grated parmesan cheese
1/4 cup crushed crackers (I had some leftover club crackers, but any type would work fine as long as they're crushed fine)
1 tsp Adobo seasoning
Black pepper
2 tbsp olive oil

1 bunch of broccolini
3 carrots 
Salt for seasoning the water
3 cloves of garlic minced
2 tbsp olive oil


Slice the carrots to a similar thickness to the broccolini, put in a pot, and cover with water.  Add some salt to the water and boil until you can stick a fork into the veggies without too much effort.  Drain and set aside while you prepare the fish.

Mix the parmesan cheese, cracker crumbs, Adobo, and black pepper on a plate.  Dip fillets in a little milk and dip into the breading mixture.  Try to pack as much of the breading onto the fish as you can with your hands so you'll have a nice crust.

Preheat 2 tbsp of olive oil in a frying pan on medium heat (non-stick is best to keep the crust on the fish instead of in the pan!).  Cook fish for about 4 minutes on each side.

To finish off the veggies, add the other 2 tbsp of olive oil to the same pan you boiled in.  Add the minced garlic until right before it starts to brown on medium-high heat.  Add the veggies and saute for 3-4 minutes just to get the veggies good and garlicky, not to cook them any more.

I served up our fish and veggies with a lemon wedge than added a nice little bit of acidity to counter the salt and the garlic in the dish.  As you can see, we ate this dinner with some cider.  Overall, a fairly quick and easy Tuesday dinner.

Friday, April 15, 2011

Recuerdos de Tortilla

   The tortilla española is a food that is particularly close to my heart.  Some of my fondest memories have revolved around this very food, and cooking it causes those times flood back into my consciousness.  The photo above is from Valentine's Day 2008, which I shared with my gorgeous and quintessentially Spanish roommates and Brazilian classmates during my 6 months abroad in Galicia.  
   We had a little tortilla fiesta during which I had the pleasure learn from the girls how each of their families traditionally made tortillas.  The gallegas debated the austurianas intensely over how many eggs to use and whether it was okay to add onions.  I learned the answer to a very important question that day.  Who makes the best tortilla in the world?  Your mom does.
 
   Going out for tapas and drinks with friends is most definitely my favorite Spanish ritual.  It was during those times that I learned the most when I was studying abroad.  It's about conversation, good food, and just generally enjoying the little pleasures of life.
   The following are some photos of my best times munching on tortilla, queso, pulpo, y más with my Spanish, Greek, English, Turkish, American, German, Brazilian, Japanese, and Swedish compadres in Spain.  Food and drink brought us together from all corners of the globe in a particularly unique way that I can barely describe in writing.


I love drinking wine out of tiny bowls.

And finally, since this post is about tortillas, here is my recipe for Tortilla Española.

4 small to medium-sized Yukon Gold potatoes peeled and chopped into 1 inch pieces
1/2 cup olive oil
4 medium eggs
1 small onion diced
1/2 cup sliced button mushrooms (optional)
Salt and paprika to taste

Fry potatoes in olive oil until golden brown.  Remove from frying pan with slotted spoon and drain on paper towel.  You'll want enough potato chunks to make an even layer in your frying pan.  Reserve the frying oil in a cup for cooking later. **A non-stick frying pan makes this recipe a LOT easier!**

Cook onions and mushroom in some of the leftover oil until just softened.  I don't always add mushrooms to a tortilla, but occasionally I like to add them for texture.

Whip up the eggs and mix with the potatoes, mushrooms, and onions in a bowl.  Add a little of the olive oil to your frying pan (you can use the same frying pan you have been using through this recipe).  Add the egg mixture to the pan. Shake the pan to keep the tortilla from sticking to the bottom.  You can also use a rubber spatula and run it around the edges of the tortilla to ensure that it is not sticking.
Okay, here comes the tricky part.  Flipping.  This is one of the main things that makes a tortilla different from a frittata.  Take a plate that is larger in circumference than you frying pan and place it upside down over the pan.  Hold the pan in one hand and place your other hand on the plate.  Flip the entire pan over onto the plate so that the entire tortilla is sitting on the plate, cooked side-up. Slide the tortilla back into the frying pan and continue to cook and shake until it feels firm to the touch. 

Once cooked, flip the tortilla onto a plate or a cutting board and you'll have a nice little potato cake.  Sprinkle a bit of salt and paprika over the top while it's still warm.

You can slice it up into triangles or squares and eat it right away while it's warm.  Or, and this is how I prefer it, chill it in the fridge and eat it cold.  Purists may eat it plain, but plenty of us eat it with a healthy squeeze of ketchup on top. 

Monday, March 21, 2011

Sangria anyone? -- Recipes from my housewarming party

Homemade Sangria... mmmm.


I know it has been a little while since my last post, but I am here and coming back in full force with a few recipes.  This past weekend I held a housewarming at my apartment which I now have to myself.  I decided I wanted a Spanish themed party, so I created a menu of Sangria and Tapas.

The weekend ended up being a little hectic because I had to go into work on the night of my party for a couple of hours.  The result of this fiasco was that I had to cook very quickly and sadly do not have any photos of the food I made.  I think I have more than a couple of witnesses who can testify that the food tasted pretty damn good, though.

  Regardless of the lack of photos, I am including in this post recipes for:

Sangria
Garlic-Thyme Chicken Wings
Tortilla de Patatas
Tuna Steakpops


SANGRIA

3 liters of lighter bodied red wine 
(I would go for Pinot Noir, Red Zin, or Merlot... boxed wine works great for Sangria and is wallet friendly!)
1.5 cups of fruit flavored brandy (I used blackberry this time around)
2 oranges cut into1 inch pieces
3 apples cut into 1 inch pieces
1 lemon cut into 1 inch pieces
1 lime cut into 1 inch pieces
1/2 cup sugar
1 liter citrus flavored soda (My soda of choice is usually Fresca)

Mix all ingredients except the soda in a large container and keep in the fridge for at least 6 hours to let the flavors harmonize.  I kept mine overnight and the fruit was super wine-steeped and delicious.  When you want to serve the sangria, you can either pour the soda into the container with the sangria or top off each glass with a splash of soda to brighten up the drink.  Don't forget to serve each cup with some fruit in it!  What could be better than getting your daily serving of fruit and getting tipsy at the same time?

GARLIC-THYME CHICKEN WINGS

3 lbs chicken wings 
(Since I was on a budget I used one of those big bags of frozen wings, but you can also use a pack of fresh ones)
6 cloves garlic, crushed with the back of a knife
1/3 cup olive oil
1 cup white wine
1 cup water
1 tbsp Adobo powder
3 sprigs fresh thyme
2 dried bay leaves
1 tbsp Vietnamese chili garlic sauce (I use the one with the  green cap and the rooster on the front) or red pepper flakes

I sort of improvised on this recipe because I didn't really have all of the ingredients the recipe I was referencing required.  It was risky, but it ended up turning out great!  Also, this is the easiest recipe ever!  

Preheat the oven to 375.  Place wings and all other ingredients into an oven-safe vessel.  Stir to settle everything together and bake.  40 minutes if the wings are thawed and 1 hour if the wings are frozen.  Serve either in the dish with the cooking liquid or take wings out onto a plate.

**** I made these before I had to go to work on Saturday and ended up putting them into the fridge.  Everybody at the party ate them cold a couple hours later before I got home and STILL loved them!  I will definitely be making this chicken again. ****


TUNA STEAKPOPS

Good seafood is becoming available in the supermarket again, and if you live in Krogerland, you can buy some great fresh fish pre-seasoned and/or marinated in the seafood section.  My Kroger happens to sell tuna steaks coated in coarse ground black pepper and includes teriyaki butter.  I try to buy these tuna steaks whenever I can find them for a fair price.  In order to make them into party food, I cut the steak into cubes and pan seared them for about 5 minutes on med-high heat in olive oil.  Depending on your preference, you can leave more or less pink in the center.  I usually cook my tuna to medium.

Dipping Sauce:
Teriyaki butter (or if you don't have any pre-made from Kroger use 1 part teriyaki sauce to 2 parts butter)
Soy sauce
Rice wine vinegar
Chili Garlic Paste (the Vietnamese one from before)

Combine over low heat in a pan using proportions that taste good to you!  I am saying this because I didn't really measure, but, basically, experiment with the flavors until you like the way the sauce tastes.

I ended up serving the tuna bites on colored toothpicks (hence the name tuna steakpops) with the sauce poured over them, but I think a dipping bowl of the sauce would have been a bit more effective.  They were a big hit!

Steakpops, Cakepops!  I almost forgot!  My awesome sister made Cakepops for dessert.  Red velvet cake coated in milk chocolate and nuts or white chocolate.  NOM!  They were amazingly delicious.  I had some for breakfast this morning.  She also made some tasty chocolate covered strawberries, but they were gone too quickly to get photographed. 


I plan on making a small tortilla for breakfast in the morning, so I will take photos and include a detailed recipe tomorrow.  Get excited.


Thursday, March 3, 2011

Give Peas (and Pesto) a Chance Pasta

In case any of you readers have never met me (unlikely), this is me cooking!  Kuddos to Patrick for taking a flattering photo!
 
  I chose to give this pasta such a corny name because it's inspired one of  Rachel Ray's recipes.  If you know anything about her you know she's crazy and gives her recipes particularly corny names.  Also a quick shoutout to my sister Christie and our friend Katie Paige.  Let's see if they remember singing the All-That version of this song on the playground as kids.

  Now, if you know anything about me, or you have read my sweet potato chili post, you know I'm particularly obsessed with pesto.  I have been known to say I would eat cardboard if it were spread with pesto.  This week I really wanted to start posting pesto-related recipes.

  I regularly make pesto eggs and pesto pizza, but a little google searching brought me to Rachel Ray's recipe for a 3-veggie pasta with pesto.  Her three veggies included zucchini, asparagus, and green beans, and she makes her own pesto.  I love pesto, but I don't yet have the tools to make my own, so I got refrigerated store bought.  I like Buitoni or the made-in-supermarket kind, but not the kind in the jar in the pasta aisle with the spaghetti sauce.  Try the refrigerated kind, and you'll never go back to the other stuff.  I could eat it with a spoon, but usually try to be a bit more civilized and use it as a dip (i.e., eating it with an edible spoon). 

***The trick with pesto is to eat it fresh, as it is.  You can warm it up with the heat of some food (pasta, veggies) or eat it cold, but never cook it!***

  Alright, if I don't stop myself, I could be raving about pesto for who knows how long.  So, here's the easy and veggie-packed recipe for Give Peas (and Pesto) a Chance Pasta.

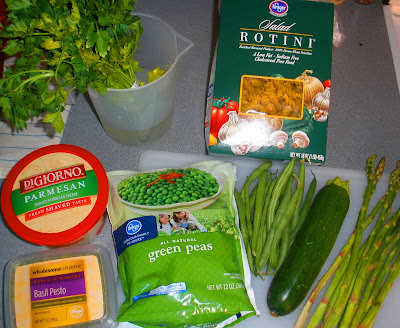
Mis en place!  A french phrase I have retained since high school "Intro to Culinary Arts."  It's a little snooty, but it makes for a good ingredient photo for this blog and helps me stay organized =P
-1/2 lb of you favorite pasta shape
-1/2 cup frozen peas (these were not in Rachel's recipe, but I thought they would be a good addition... plus peas lend themselves to good titles)
-1 small zucchini
-8 stalks of asparagus
-A handful of fresh green beans
-3/4 cup store-bought (refrigerated) or homemade pesto
-Parmesan cheese for serving

Put a pot of water on the stove to start boiling for the pasta.  You are going to cook the pasta and the veggies in the same water, so get your veggies prepped while the water is boiling.

Cut green beans, asparagus, and zucchini into similarly shaped, 2 inch pieces.  This means cut the tips off the green beans and cut them in half, remove dry ends and quarter the asparagus, and cut the zucchini into little planks.  Set those veggies and the the peas to the side. 

 At this point your water should be boiling.  Dump in the pasta and salt the water.  Let the pasta cook for 6 minutes (it won't be fully cooked yet).  Now it's time to add all four veggies.  Let the pot come back to a boil and cook the pasta and veggies for 3 more minutes.  You want both the pasta and the veggies to be al dente.

Before straining, take out 1/2 cup of the pasta water and set it aside.  Strain the pasta and veggies and dump them back into the same pan with a little bit of olive oil to keep everything from getting sticky.  Add pesto, salt and pepper to your taste and thin the mixture with the pasta water you saved.


Serve immediately with parmesan sprinkled over the top.  As you can see we ate ours with some Rogue Hazelnut Brown Ale.  This was our first time trying this particular Rogue brew and it was goooood, especially alongside this bright and tasty pasta dish.


P.S. For those living in Richmond, Kroger-made pesto is quite good and fairly-priced.  I found it in the deli section with the fancy cheese and the hummus.

Tuesday, March 1, 2011

Ground Chicken Burger Pitas

Experimenting with food has it's risks.  Sometimes I get over-ambitious when something should just be simple.  The result is food that is edible, but could be a lot better.  That is what happened with these chicken burgers.  I added an egg to the meat when I should have left it out.  It was a good meal, but it would have been a lot better without the egg.  So if you try this recipe, make it huevo-free.

Here's what you need:
1 tsp Adobo
1 tsp Salt
1 tsp Black pepper
1 tsp olive oil
1/2 lb Ground chicken
1 chopped shallot
Pita bread
Lettuce (I prefer arugula or some sort of baby lettuce)
Tomato
Rosemary and Garlic Mayo (Mince garlic and fresh rosemary and mix into mayo.  If you make it the day before, the flavors will be nicely blended.  This mayo recipes is thanks to Giada de Laurentiis.)

Before you start cooking, wrap the pitas in foil and put them in the oven on 250 to warm.

Combine ground chicken, the spices, the shallot, and olive oil.  Yes, there's the egg peeking out from underneath the shallots.  Pretend it's not there.  Squish the ingredients together with your hands and create patties in the size of your choice.

Cook patties on a grill or pan until cooked through.  This is chicken, so make sure they're well done!  If you can keep yourself from squishing them with the spatula while they're cooking, they'll stay juicy.

Spread the mayo in the warm pitas and stuff with chicken patties, tomato slices, and lettuce.

I ate mine with a salad of lettuce, grape tomatoes, olive oil/rice wine vinaigrette, and cheese.  ¡Que aprovecho!

Monday, February 28, 2011

A quick nod to Cakewrecks

Yay!  I used my new mixer for the first time last week.  Isn't is awesome?  It came with dough hook, whisk, and standard mixing attachments AND a spatula.  Thanks Mom!


  Anywho, I read about 5 blogs somewhat regularly and 3 of them happen to be food blogs.  Cakewrecks is one of them.  It's like a failblog for professionally decorated cakes.  Maybe that doesn't sound so funny to you, but let me tell you, it's hilarious.  http://www.cakewrecks.blogspot.com/  The Cakewrecks author is a funny lady and often has posts dedicated to cakes decorated in chocolate icing in extremely unfortunate shapes.  More about that later. 

  So last week I made a cake because I had cake mix.  It was pretty tasty.  Here are a few photos:

Mixing up the Duncan Hines Butter Golden cake mix.  Yes, I condone bake cheating.  Now, I think most things taste better if made from scratch, but cake from a mix just tastes so good! 

This is the mix in the greased and floured pan.  I included this photo because I was amazed at how much the cake mix increased in volume, but you can't really tell with my sub-par photography.

I cut the cake into 2 halves so I could layer it and used a homemade chocolate buttercream icing.  Easy peasy.  It's just butter, shortening, cocoa, powered sugar, and a little milk.  No measurements necessary, in my book.  Just get it to the consistency and flavor that you like.  An electric mixer help when you like really fluffy icing.

Back to my Cakewrecks reference.  So I iced the cake and had a good amount of icing leftover.  The author likes to point out that many professional bakers make swirls of chocolate icing that very unfortunately look like swirls of poo.  Generally it's unintentional, but it's hard to think of anything else when looking at a brown swirl of any kind of paste.  So poop-swirl trim it was on the Tuesday cake!  I'm 23 and poop jokes still make me laugh.  What can you do?


Chocolaty, buttery goodness.  NOM.  My next post will be slightly more experimental and will include a recipe, not to worry.  Happy eating!